John Deere is a household name in machinery and heavy equipment manufacturing, with the brand’s lawnmowers being some of the best.
When it comes to lawn care equipment, one of the most crucial parts is the deck.
And John Deere makes it easy for you to service the deck on your lawnmower by making all the parts from the original equipment manufacturer readily available.
However, you will want to know which parts there are to know what to look for and make the most of this handy provision.
So here is John Deere 42 Inch Mower deck parts diagram, along with some key information you will want to know when solving deck-related problems yourself.
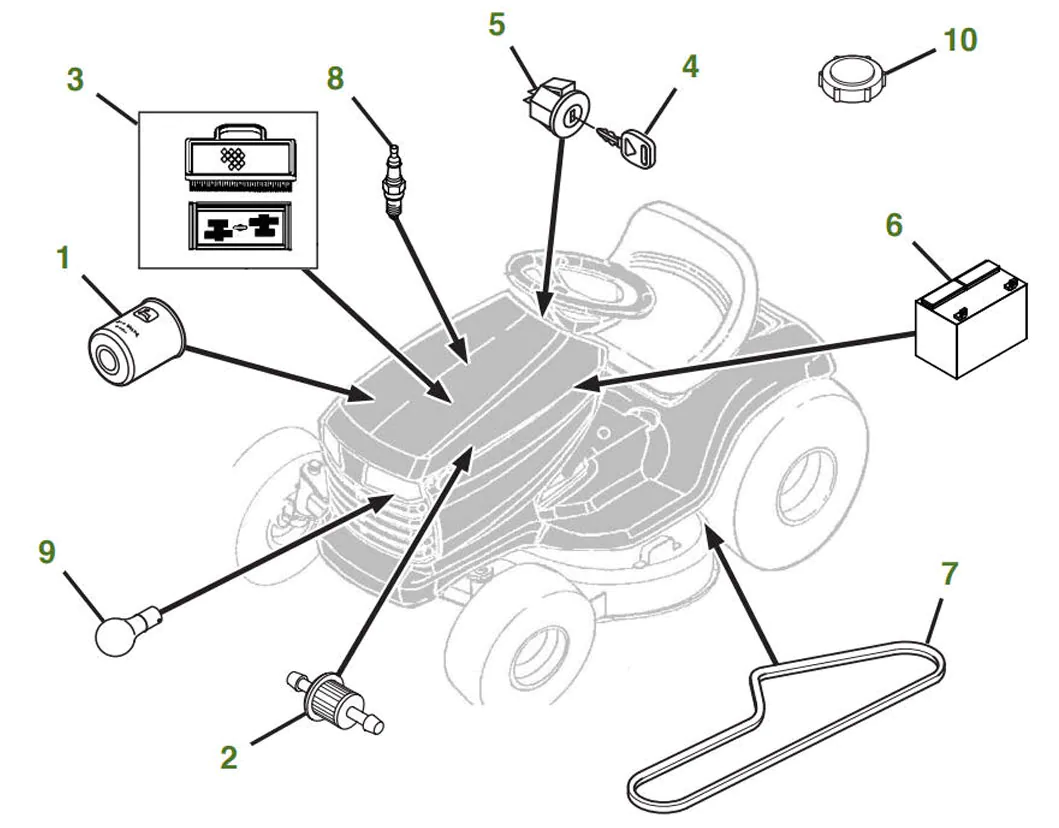
John Deere 42-inch Mower Deck Parts
This section presents a rundown of the various components comprising the 42-inch mower deck from John Deere.
This should help simplify your work if you want to diagnose a problem or replace a damaged part—you will know just what to look for.
1. John Deere Right-Hand Belt Cover
The deck on your 42-inch John Deere lawnmower deck has two belt covers on either side.
As the name suggests, the right-hand belt cover sits on the right side of the deck, shielding the V-belt from that end.
The right-hand belt cover on your mower deck is black, so you should easily identify it by eyeballing the component.
Related: John Deere 1025r hydraulic problems
2. John Deere Left Hand Belt Cover
Another belt cover sits on the left side of the lawnmower deck.
This is called the left-hand belt cover and holds the idler and other gears on top of the mower deck in addition to supporting the V-belt from the left end of the deck.
Like its twin on the right-hand side, the left-hand belt cover is black and almost identical to the right one.
The belt cover is designed to ensure smooth engagement and helps reduce stress on the V-belt and the mowing equipment.
3. Self-Tapping Bolt
This bolt is designed to fit into place with a simple twist easily. You can twist it clockwise or anticlockwise to insert or remove it.
You can ensure the bolt fits better with a simple tap, joining the adjoining components.
4. John Deere 10 MM Lock Nut
This lock nut is typically a 10 mm piece inside the belt cover hole. Your mower deck should have two of these used to adjust the level of your deck.
Therefore, you can use the two 10 mm lock nuts on your lawnmower to lift or lower the deck.
5. Flat Idler Pulley
The flat idler pulley is one of the pulleys that support the deck belt. You can tell it apart from the other pulleys based on the black color that sets it apart.
This pulley sits on the deck’s inside to support the deck belt’s outer area. Aside from the color, you can also identify this pulley by its relatively smaller size than the idler pulley.
6. John Deere Deck Idler Pulley
There are two of these pulleys on the 42-inch John Deere mower deck. This pulley is slightly bigger than the flat idler or standard pulley.
Its golden color is another outstanding feature that differentiates it from its smaller cousin.
The deck idler pulley supports the deck belt from either side of the deck and helps create the required tension for blade movement.
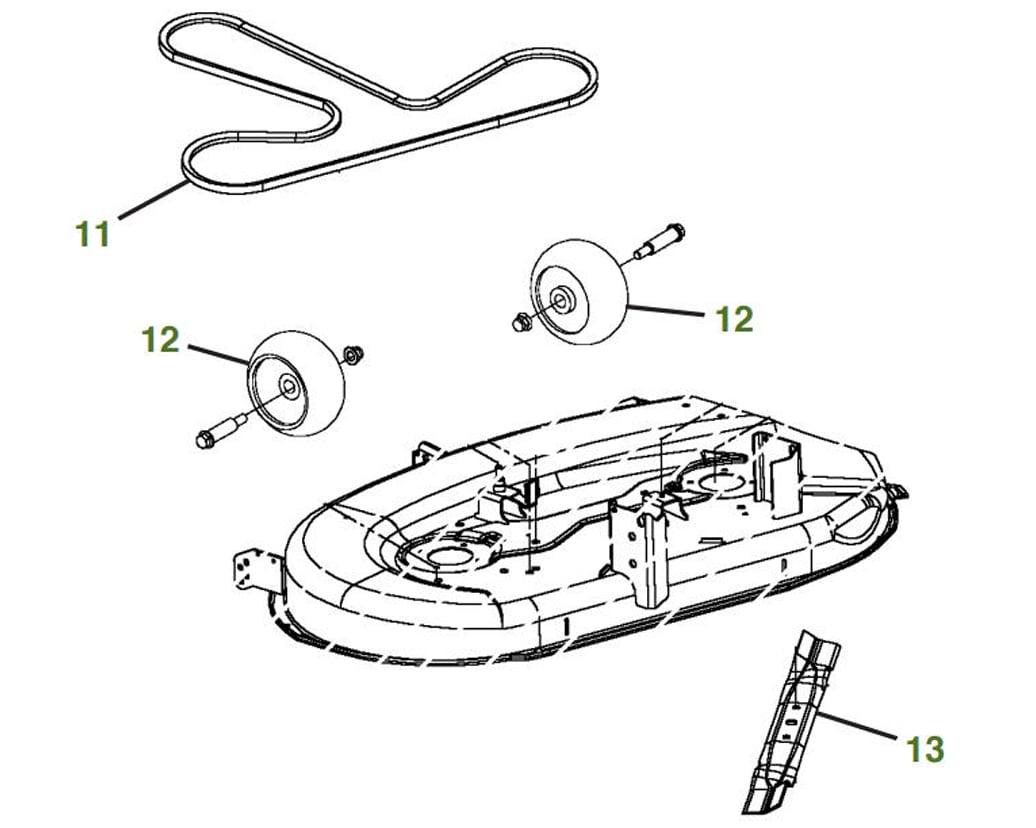
7. 42-Inch Deck Drive Belt
The 42-inch mower deck from John Deere has only one belt responsible for the movement of its blade, the V belt.
This belt is typically black and runs around the system of pulleys on the deck. The belt covers the entire deck for the various John Deere lawnmower models.
8. Spindle Nut
The spindle nut sits at the mid-point of the mower deck’s drive sheave. The spindle nut looks like a standard nut and is typically silver-colored.
9. Spindle Drive Sheave
The spindle pulley is designed to sit between the bearings to ensure smooth, vibration-free running at any speed.
In the John Deere mower deck, it acts as a plate that holds a screw and a nut. The sheave is mounted in the middle between the deck cover and the nut.
10. John Deere Bushing
Bushings are cylindrical linings typically designed to reduce friction and wear inside a hole in a machine.
They often work as casing for a pin, shaft, or hinge. The bushings on the John Deere 42-inch mower deck are not any different.
One of them sits beneath the retainer clip, while the other one is mounted under the screw to provide a smooth mechanism.
Read: Common John Deere 4066r Problems
11. Extension Spring
The extension springs on the John Deere mower deck are designed to ensure consistent idler engagement and proper performance of the mower deck, thanks to their proper tension.
This particular spring is long and fits on the edge of the idler arm, getting hold of it and securing it in place.
12. John Deere Torsion Spring
Like any torsion spring, the John Deere torsion spring has several twists for counterbalancing purposes.
This tiny steel component sits on the deck cover and can be accessible once you remove the screw, bushing, and retainer clip.
13. Retainer Clip
The retainer clip sits below the screw and right over the bushing. The role of the retailer clip is to help keep the screw upholstery securely in place.
14. M8x25 Screw
On top of the retainer clip is a special screw, the M8x25 screw responsible for holding the part together.
This screw is easy to locate because it is visible above the mower deck cover.
15. Blade Brake Pad
As the name suggests, the blade brake pad is a component specially designed to contact the blade pulley to stop the rotating blades.
Naturally, the pads may wear down over time and require replacement to maintain the equipment’s peak performance. So you’ll want to know what to look for to locate it.
The brake pad is L-shaped and sits on the deck case, making it easy to locate. It is also referred to as a thin block due to its size.
16. John Deere Lock Nut
This lock nut is a small component that fits on the brake pad to provide the required support for the big rod in this part.
17. Blade Lock Nut
The blade lock nut helps lock the blade under the lawnmower deck. You can locate the nut by checking the middle section of the underside of the deck.
18. John Deere Bracket
The bracket is designed to hold several small components in place. It has multiple holes and spaces where these components fit, one of them being the hole that carries the self-tapping bolt right above the deck.
19. Deck Spindle
The deck spindle is a crucial part of the lawnmower cutting deck; it works with the belt and pulleys to perform clean and even mowing.
This essential component fits in the middle of the mower’s tiny gears. The deck has two holes on the right and left sides to accommodate the spindles.
20. 42-Inch 3-in-1 Mower Blade Set
Naturally, the mower blade is responsible for cutting. The large blades sit under the mower deck in a free, sheltered space allowing them to perform their role uninhibited.
John Deere’s 42-inch mower deck has various mechanisms in this area that help enable the blade to function.
21. Blade Washer
Like most parts that require fastening into place, the mower deck uses blade washers to secure the blades.
The role of the washer is to ensure better tension and grip, which are essential to the proper function of the blade and the mower as a whole.
You can locate the washer by looking for it between the blade and the lock nut, where it provides the required seal.
22. 5/8-Inch Spindle Shaft
The spindle shaft is an essential component for properly working the mower blades. It is located under the spindle, providing the blades with the adequate space they need to operate.
You can locate the spindle shaft by looking for a sleek pipe under the deck hole.
23. John Deere Belt Cover Rod
This solid, cylindrical object fits directly in the space beneath the left-hand belt cover, allowing the cover to sit on top of the mower deck.
24. Deck Spring (or Rod)
This component attaches to the deck idler arm. It can be an extension spring or rod, depending on what your John Deere 42-inch mower comes with.
Either way, its function remains the same whether it is a rod or spring fitting into the idler arm. It helps allow the idler pulley bracket to pivot when turning off or activating the blade rotation.
25. Deck Idler Arm
The idler arm forms part of a set of idler components, including the idler pulley and the idler arm spring that put tension on the mower deck drive belt to enable the lawnmower to operate.
This component resembles a small guide and helps hold the tiny accessories, enabling them to fit on top of the deck cover.
26. Deck Rod
The deck rod is a long and sleek metallic rod that helps with the deck’s orientation on your John Deere mower.
The rod is used inside the brake pad, which helps ensure the components function properly.
27. Anti-Scalp Wheel
The high-end John Deere mower has anti-scalp deck wheels that prevent the deck from coming in contact with the ground.
These wheels are handy when the deck passes over a raised spot, as they protect the blades by keeping the deck from coming into contact with the raised ground.
This way, the wheels help prevent scalping (slicing off) undesirably large clumps of grass in such areas.
John Deere 42 Inch Mower Deck Parts Table
| Part | Function |
|---|---|
| Right-Hand Belt Cover | Shields the V-belt on the right side of the deck |
| Left Hand Belt Cover | Supports the idler and gears on the left side of the deck and holds the V-belt |
| Self-Tapping Bolt | Easily twistable bolt used for joining components |
| John Deere 10 MM Lock Nut | 10 mm nut used for adjusting the deck level |
| Flat Idler Pulley | Supports the outer area of the deck belt |
| John Deere Deck Idler Pulley | Supports the deck belt and creates tension for blade movement |
| 42-Inch Deck Drive Belt | The V belt responsible for the blade movement |
| Spindle Nut | Nut located at the midpoint of the deck’s drive sheave |
| Spindle Drive Sheave | Plate holding a screw and nut, mounted between the deck cover and the nut |
| John Deere Bushing | Cylindrical lining reducing friction and wear, used beneath the retainer clip and screw |
| Extension Spring | Provides tension and secures the idler arm |
| John Deere Torsion Spring | Counterbalances the deck cover and can be accessed by removing the screw, bushing, and retainer clip |
| Retainer Clip | Holds the screw upholstery securely in place |
| M8x25 Screw | Special screw visible above the mower deck cover |
| Blade Brake Pad | Contacts the blade pulley to stop rotating blades |
| John Deere Lock Nut | Supports the big rod in the brake pad |
| Blade Lock Nut | Locks the blade under the deck |
| John Deere Bracket | Holds multiple small components in place |
| Deck Spindle | Essential for clean and even mowing, works with the belt and pulleys |
| 42-Inch 3-in-1 Mower Blade Set | Cuts the grass |
| Blade Washer | Secures the blades in place and provides tension |
| 5/8-Inch Spindle Shaft | Provides space for the mower blades |
| John Deere Belt Cover Rod | Fits beneath the left-hand belt cover |
| Deck Spring (or Rod) | Attaches to the deck idler arm and allows the idler pulley bracket to pivot |
| Deck Idler Arm | Holds the idler pulley and puts tension on the deck drive belt |
| Deck Rod | Helps with the deck’s orientation on the mower |
| Anti-Scalp Wheel | Prevents the deck from contacting the ground to avoid scalping |
John Deere 42-inch Mower Deck Belt Diagram
See Also
- Resolving John Deere 2025R problems
- 3039R troubleshooting and Solutions.
- F725 troubleshooting with included fixes.
- Tackling the problems of John Deere Gator 825i
How to Troubleshoot a 42 john deere mower deck
Double- and triple-blade lawnmowers like the John Deere 42-inch mower are commonplace. That extra swath comes with additional moving parts to make the whole thing work.
Aside from common routines like checking the oil level, understanding the anatomy of the mower’s deck is a big first step toward maintaining a properly functioning lawnmower. However, it should not end there.
Sometimes your mower will stop working properly, and knowing the critical dynamics, such as how to troubleshoot or repair it, can help you solve some common problems that could otherwise cause mechanical breakdowns.
Troubleshooting your mower deck is all about isolating and diagnosing existing problems to address them before they spread or become serious.
So, this section walks you through troubleshooting the mower deck.
Step 1: Inspect the deck for bent or damaged components
Start by switching off the engine if you have not done that already.
Once the mower is at rest, take a moment to visually inspect the blade and the other components (discussed above) for any noticeable signs of damage.
Damaged components may cause excessive vibrations while operating heavy lawn-care equipment. You can pay attention to any such vibrations to isolate their location or source before switching off the engine to troubleshoot the deck.
You want to closely examine your mower blades, studying their orientation and shape.
Is any blade bent? Or is there any loose nut attaching the blades to their corresponding spindle on the deck?
If the mower deck has bent or damaged blades, your options may be limited to replacing the entire set.
What if you cannot tell whether the blades are bent by eyeballing them?
Sometimes the blades can be slightly bent so the naked eye cannot detect the problem. In this case, a bit of science will help.
Put the mower on level ground with the blade tips pointing toward the left and right of the mower rather than toward the back and front.
Next, measure the distance from the blade’s tip to the ground. Note this measurement and give the blade a 180-degree rotation so the tips trade places, with one taking the other’s previous position.
Repeat the measurement for this blade as well and note it down. Compare the figures to ensure they are the same.
The two measurement results failing to match indicates a bend in the mower blade, which requires replacement.
For a lawnmower with multiple blades, you must repeat these steps for each blade on its deck to determine if they are straight.
Step 2: Sharpen your mower blades if the turf has a brown cast
The second thing you want to do is check your turf for any signs of ruggedness or brown cast appearing.
Dull blades damage the lawn, injuring the grass, eventually turning brown. The damaged turf can be more susceptible to disease.
All of these will be telltale signs that your mower blades are dull and could use some sharpening. So, inspect the lawn immediately after mowing to see if it looks rugged.
If you haven’t recently used the mower on your lawn, check for the grass to see if it appears brown.
After detecting the signs of dull blades, you will want to:
- Wear protective gear, including a pair of eye goggles and gloves.
- Use a grindstone or 10-inch file to sharpen the edge of each blade, keeping the grindstone or file at roughly a 45-degree angle.
- Sharpen the blades from the top side of the cutting edge for the best results.
- Push the grindstone or file in one direction along the mower blade.
If the lawnmower blades are damaged, ensure you replace them. Sharpening should be part of the mower’s care and maintenance routine, happening at least once a year or more frequently if necessary.
The turf or how you use the lawnmower will significantly determine how soon you must sharpen or replace the blades.
Step 3: Check the deck level
The large deck on John Deere has its large share of advantages. However, that sheer size also makes the deck susceptible to becoming un-level and losing its proper orientation.
You want the deck to be perfectly horizontal for proper cutting. But once it loses that orientation, it loses its ability to cut the grass evenly.
Against that backdrop, the sight of the uneven lawn after cutting should be a sign that your mower deck is not level. However, that is not the only way to diagnose the problem.
Consider parking your mower on level ground and measure the distance between each outside edge of its deck and the ground.
A level deck should have these two figures tallying. However, if the figures are different, your mower deck is un-level, and the problem needs to be corrected.
Subtract the numbers to determine the difference. If it is a quarter of an inch or higher, identify the lower end and adjust it accordingly by raising it.
How to adjust your John Deere mower deck
- Identify the lower end of your deck by subtracting the distances of the two sides from the ground.
- Locate the lift adjustment nut on the lower end of the deck. This nut is next to the lifting yoke. Each side has this nut for side-by-side height adjustment.
- Use a wrench to turn this nut clockwise. If you lower the higher end instead, you will turn the nut anticlockwise (anticlockwise is down, and clockwise is up).
- Alternate between the adjustments you make to the nut and checking the deck edge height from the ground.
- Repeat this until the height measurements of either side of the mowing deck from the ground tally.
How to adjust the mowing deck back-to-front
Your mower’s deck will not always be un-level, only from side to side. It can also lose its proper orientation from back to front.
In proper orientation, the front-facing side should be half an inch lower than the opposite side (back-facing end).
If the deck is out of orientation in this manner, follow these steps to diagnose the problem and fix it:
- Position one blade to have its tips facing the back and front of the mowing vehicle.
- Measure the distance between the tip of the front-facing blade and the ground, and note down this number.
- Repeat the measurement for the back-facing blade and note down the height of its tip from the ground.
- Check if the numbers match or if the front is between an eighth and half an inch lower than the back. If not, get a wrench and proceed to the next step.
- Use the wrench to turn the front adjustment nut clockwise to raise that side or anticlockwise to lower it.
- Measure the height after every few quarter-turns until they are within the recommended range.
Step 4: Raise the deck if it leaves some patches of grass uncut
If you have noticed that your mower leaves some patches uncut during operation, you may be riding it too fast.
The first fix is to slow down your tractor speed to allow the blades more time to cut the grass effectively.
Additionally, you should not cut more than one inch of grass at a time, so consider raising the deck slightly to fix the issue.
Use the height adjustment knobs on both sides of the deck and follow the procedure in step 3 above.
Step 5: Examine the mower deck drive belt for signs of wear
You can tell that your mower’s deck drive belt is worn out if it produces a squealing sound while operating.
If you have heard such sounds, switch off the engine and take a moment to examine the drive belt on your mower deck before you carry on.
Is the belt noticeably stretched? Does it have nibbled or cut parts along its length? Any signs of damage on your belt would signal the need for replacement.
A worn drive belt affects the mower’s operation, so your best choice is to replace it in time to restore optimum operation.
If you work with a stretched belt, the chances are that it will begin to slip on the mower deck pulleys. This constant slipping can significantly affect your work.
A damaged belt may also have flat spots or cracks along its length on the inside edge. Such damages render the belt defective.
Consider replacing it to fix or avoid the associated problems altogether.
How to Replace a Damaged Mover Deck
Troubleshooting your mower deck should help you isolate problems and fix them accordingly. Unfortunately, you can only do so much fixing on your mower deck.
Sometimes the entire deck will sustain mechanical problems that downgrade its overall performance. When this happens, replacing the deck becomes inevitable.
Thankfully, the mower deck replacement process can be pretty straightforward if you are mechanically inclined. You need the right kit and know how to do it.
Every model or mower brand will have some differences, but you can be surprised at how many of these from different manufacturers are similar.
This means the same knowledge can apply across various models and mower brands. Once you have your new deck to install, you will need to:
- Locate and loosen all belt guards on your current deck.
- Loosen the bolt that is attached and tightens the mower deck drive belt.
- Disengage the mower deck drive belt from its drive pulley.
- Remove the series of clips, bolts, nuts, or pins from the mounting brackets of the mower deck. Most mower deck models will typically have a wide one on the front-facing side and two smaller ones on the back-facing side to allow the deck to swivel appropriately.
- Remove the deck from under the mowing truck once it is fully detached.
- Finally, reverse the entire process to reattach the new deck, and voila—your work is done.
That is the summary of the overall process for all lawnmower types. However, this guide looks at replacing a damaged deck on your John Deere mowing tractor for more explicit assistance.
How to replace your mower deck step by step
- Start by reading all the safety information from your new mower deck. This information will help make the servicing your lawnmower safer and free from incidents.
- Place the lawnmower on flat, level ground, with the cut lever height at its lowest position.
- Disengage the blade control switch and engage the truck’s parking brake.
- Turn off the engine and remove the key from the ignition.
- As you start with undoing the deck, get yourself something to put all the pieces in. you can purchase a magnetic tray, which does the job perfectly, ensuring you don’t lose all the bolts, nuts, and pins you will remove from the mower. The good news is, this tray comes at an affordable price at the local stores.
- Now, drop the deck to the ground.
- Next, check right below the deck height adjustment lever on the left side of the mower tractor. Here, remove the clip and the washer to set the hook free. Grab the hook and set it aside together with the clip and washer.
- To remove the hook, twist it, and it will come off. Twisting it up locks it back in place.
- Move to the middle of the deck, where you should see the next clip. Grab it, remove it from its place, and remove the washer. This should set the bar free, so simply knock it down to detach the deck from the mower truck in that area.
- Move toward the front of the mower where you will find the deck rod. Remove the clip that attaches this rod to the front of the deck to set it free. The rod should pop off easily once you have removed the attachment clip and the washer.
- Move over to the other side of the mower tractor at the rear. Here you will do pretty much the same thing as you did on the opposite side.
- Grab the clip and the washer. Once you have removed them, pull out the hook and twist it down to remove it from the mower deck.
- On to the middle of the deck, remove the clip and the washer, and then pop off the deck attachment bar in that area. This should allow the bar to drop down.
- Return to the left side of the mower truck where you started. Here, locate the spring and gently pull it to get it off its anchor bolt. This will relieve the tension on the upper drive belt in order to unloop it from the drive assembly.
- Now that the tension is gone, it’s time to get the belt off the pulley. Still, on the left side of the tractor to the front, take the belt out of the belt guide and drop it down off the pulley.
- Move over to the right side of the truck and get the belt off of the right-side belt guide. This should complete the process of detaching the deck from the mower truck, so just slide the deck from under the mower.
- Get your new deck right under the tractor. Reattach the bar in the middle of the deck, put the washer on, and clip it into place.
- Slide the hook into place facing the back of the mower, twist it up, put the washer on, and then clip it into place. Repeat these steps for the deck attachment bar and hook on the right side of the tractor.
- Head over to the front of the mower and reattach the front support rod back into place. Attach it to the deck, put the washer on, and clip it.
- Loop the belt around the pulley, setting it into the belt guides.
- Finally, hook the tension spring to the pulley arm on the left side of the track and muscle it into place to restore tension on the belt and complete the job.
- Now you can give the entire setup a final check to ensure the belt is properly looped and everything is in place before you test it out or start mowing.
Ultimately, you can decide to replace the whole machine by buying a used mower or a new one.
Can You Ride the John Deere Mower without a Deck?
Yes, you can ride your John Deere mower without a deck, but doing so is not recommended as doing so endangers the user and the mowing truck’s engine.
Why You Should Not Drive a Mower without a Deck
A lawn mower deck protects you and the mowing tractor’s engine from the blades and the debris they shoot off.
Therefore, riding the lawnmower without the deck allows the debris and mess flying from the blades to hit you and the engine.
This can potentially damage the mower’s engine or important parts like the spark plug.
The debris and will also be scattered all over the place, messing up your yard.
Can You Ride a Lawnmower without the Blade?
Absolutely. The purpose of loading the blade is to cut grass. So in case you are moving the mowing truck to another location or parking it, you will not require the blades to make that movement happen.
Additionally, you can also ride the mower without the blade during maintenance or troubleshooting. Just ensure the blades are back in place before you start mowing.
FAQs
What size belt goes on a John Deere 42-inch deck?
John Deere’s 42-inch mower deck runs a drive belt measuring ½-inch W by 103.875-inches L.
Where is the serial number on a John Deere deck?
John Deere Gator serial number chart is printed on an identification tag on the left side of the deck when you are standing behind the mower. This serial number can be 13 or 17 digits long.
What is the port on the mower deck for?
The deck washing port on your John Deere riding mower allows you to clean the deck’s underside faster and more easily. You need to start by parking the mowing tractor on level ground near a water spigot.
John Deere 42 Inch Mower Deck Parts Diagram: Conclusion
Proper care and maintenance of your mower can significantly prolong its service life.
However, to properly care for your mowing tractor, it is essential to understand its essential parts, which is where this John Deere 42-inch mower deck parts diagram comes in.
We hope this guide help answer your questions regaridng the lawnmower deck parts.
It should also help you better understand your lawnmower and save you from having to hire a technician for routine maintenance and troubleshooting.
Share your thoughts or experience with us in the comments.