A good lawnmower can make your lawn care hassle-free and your life much easier. But like any mechanical device, sometimes the riding mower blades won’t disengage, making your life the opposite of easier.
While failing to disengage is not what any of us expect from our lawnmowers, the problem does occur, and knowing how to deal with it can go a long way.
Whether you have a trusty old lawnmower or a magnificent new one, problems can occur, causing the blades not to disengage as required.
This write-up explores the common problems likely to prevent lawnmower blades from disengaging.
It also walks you through the possible diagnosis and solution for each problem to keep you better prepared.
Why Riding Mower Blades Won’t Disengage
Riding mower blades can fail to disengage due to an improper deck drive belt, clutch system malfunction, a damaged part in the idler pulley system, or a damaged or worn blade brake. However, you can diagnose and fix these problems fairly easily with the right tools and knowledge.
Below, you’ll find details of why riding mower blades won’t disengage and how to tackle each common problem.
But first, how does your lawnmower engage its blades?
Idler vs Clutch System of Engaging Mower Blades
Your lawnmower can use one of two mechanisms for engaging the blades:
- Clutch mechanism
- Idler pulleys mechanism
When looking at why your riding mower blades won’t disengage, you need to understand whether your mowing vehicle uses a clutch system or the idler pulley system.
These two systems have different components and will require different solutions.
Let’s look at each system in detail to understand what could go wrong when disengaging the mower blades.
Clutch system
If your lawnmower has a clutch system, you engage the mowing blades by moving a switch, which in turn moves a pulley assembly through electromagnetic force.
Moving these pulleys tightens your mower blades’ drive belt.
Once the belt is tight against its corresponding engine pulley, the spinning engine shaft drives it, allowing it to transfer the rotating motion to the pulleys that spin the mower’s cutting blades.
If you have a John Deere Turn mowing truck or one from Husqvarna TS Series, your lawnmower engages its blades using a clutch mechanism.
This mechanism consists of a centrifugal electromagnetic clutch that uses voltage from the mowing vehicle’s electrical components to engage the mowing blades.
The clutch system also consists of blade brakes that stop the rotation of the clutch pulley when you disengage the mower blades.
What can fail in the clutch system?
- Parts of the clutch can wear out or get corroded, causing them to jam.
- Clutch engagement switches can be broken. A broken engagement switch will prevent the control from returning to the “off” position, no matter where you set it.
- The blade engagement switch in your mower’s clutch system can be faulty.
- The wiring connecting the blade engagement switch can be faulty, resulting in short-circuiting. A short circuit in the wiring means the engagement switch keeps receiving energy even when you want it turned off. This prevents the blades from disengaging.
- The clutch brakes can be damaged during use or worn out over time. Such blade brakes cannot stop the clutch pulley from rotating, which keeps the blades spinning even when you attempt to disengage them.
Idler pulleys system
Idler pulleys, or simply idlers, use mechanical force to initiate rotational motion within a system of belts and pulleys right above the blade spindles.
The pulleys regulate a mower’s belts attached to the engine crankshaft and generate rotational movement responsible for spinning the blades. Each idler is comprised of a wheel referred to as a sheave.
The sheave is different from an ordinary wheel or bearing since it has a groove extending along the edge, designed to hold the drive belt in place.
If your lawnmower has a lever that you must turn to engage or disengage the blades, it is an idler system.
This method mechanically controls a system of pulleys and belts responsible for operating the blades and their assembly.
The engine’s crankshaft moves the pulley. This movement is transferred to the belt, which creates torque and transmits mechanical power to the blades.
Examples of lawnmowers using this mechanism include the Troy Bilt Pony Lawnmower and Craftsman LT Series mowing Tractors.
If you have any of these mowing tractors with a lever that you must turn to engage the blades, you have an idler pulleys system.
What can fail in an idler system?
- Idler pulleys wear down over time and can become progressively unable to hold the drive belt properly.
- Multiple other parts of this complex system, including the engagement lever, mounting points, mounting cable, idler arm, idler pulley, blade engagement spring, and mounting brackets, can wear out and get damaged over time. Malfunctions in any of these parts can prevent the blades from disengaging in an idler pulleys system.
Read: DIY lawn mower blade sharpening with a file
Why Riding Mower Blades Won’t Disengage in a Clutch System
You have learned the possible reasons that might cause the blades in your lawnmower to remain in the “ON” position, failing to disengage when you want them to.
This section details each of these factors to help put everything into perspective and suggest possible solutions for each problem.
1. Broken blade engagement switch
Your lawnmower typically has a safety switch installed under the operator’s seat. This is designed to detect whether you are seated and can operate the mower.
If you have ever attempted to leave the seat while the blades are running, you may have noticed them stopping abruptly.
That is the function of this blade engagement switch: to kill the engine, stopping the blade rotation the moment you leave the seat to protect you from accidents.
Unfortunately, this component is not foolproof and can malfunction.
How to diagnose the problem
Start by sitting on the lawnmower seat and engaging the brake. Once that is done, insert the key in the ignition and turn it to the “ON” position, followed by “OFF.”
This step should help you tell whether the blade engagement switch has a fault. The fault can be on the switch or the cabling attaching it to the control panel.
So you will have to go a step further to determine whether the cable or the switch has a problem.
Turning the key to the on and off positions should supply the clutch with power, creating a clicking sound indicating a fault with the switch or its cabling.
The clicking sound indicates the clutch engaging and disengaging when you turn the key in the ignition.
Next, determine whether the wiring or the switch is faulty by following these steps:
- Turn the ignition to the off position in the ignition switch.
- Disconnect the switch from the lawnmower mower.
- Cover the loose with electrical tape to prevent them from touching.
- Sit on the mower’s seat and engage the brake. After that, turn the ignition key to the ‘ON’ position to switch on the lawnmower, and then turn it off.
- If you continue hearing a clicking sound indicating the clutch is coming on and off, the fault is in the wiring. If the clutch does not respond, the fault is in the blade engagement switch.
- Test the switch with a multimeter to confirm it is indeed faulty. You should have your confirmation if power is running through the switch when you set it to the off position.
Solution: Replace the faulty blade engagement switch
If the electrical current still runs through your mower’s blade engagement switch when in the off position, you must install a new one.
The replacement should have a detailed user guide to walk you through the installation. Follow the instructions to connect the new blade engagement switch and place it back under the seat.
While at it, inspect the cables attached to the switch for any signs of rust or damage that might affect your mower afterwards. Consider removing any noticeable dirt or rust for the best results.
After installing the new switch, reattach the battery, disengage the brake, and test the lawnmower.
What you will need to complete this task
- A new switch for replacement
- Pliers
2. A short in the electrical wiring
Faulty electrical cables will continue to transmit current when the mower’s ignition key is in the “off” position.
If the clutch continues coming on and off when you turn the ignition key on and off with the blade engagement switch disconnected, your mower has faulty blade engagement wiring connecting to the switch.
Solution: Replace or reattach the damaged sections of the cables
After determining that a damaged cable is the culprit, your next task is to examine it to decide whether to replace or fix it.
How you proceed from here depends on how bad the cable looks. If it is completely damaged, you may want to replace it altogether.
However, if only a section is damaged, consider cutting that section and reattaching the two separate ends.
The idea is to avoid removing a large section that leaves the wire with undesired tension.
Whatever you do, start by disconnecting the mower’s battery to cut off power. You don’t want the engine starting while you’re working as that might cause accidents.
What you may need to complete this task
- Crimping tool
- Wire cutters
- Heat gun
- Replacement cable
Read: What is the best riding mower under $2000?
3. Bad clutch
Sometimes the blade engagement switch and the cables attaching it to the control panel will be fine, yet your riding lawn mower blades won’t engage.
In this case, the clutch itself might be malfunctioning. So, if your tests came negative for both components, the next logical place to look is the electric clutch.
How to diagnose this problem
To confirm if your mower has a bad clutch, test it out by turning it with your hand.
Consider removing the cutting deck belt first to allow you to move the pulley freely by your hand after disconnecting the battery.
You don’t want the mower powering up while you diagnose the problem. The pulley will move freely without restriction or noticeable inhibition if the clutch is okay.
But you should hear some coarse sounds when you turn the pulley if the clutch is bad.
Alternatively, the pulley will move with difficulty, indicating that something is inhibiting its rotation.
How to deal with a bad clutch
The first thing you want to do is ensure the clutch is indeed the problem and not the clutch brake.
So, check to ensure the brake is not jammed in place. A brake malfunction will mean the mower’s blades take longer than usual to disengage.
However, if your diagnosis indicates a bad clutch, your solution is to change it.
- Disconnect the battery and remove the clutch connector.
- Gently take the drive belts off the pulleys following the instructions in your owner’s manual.
- Remove the hood or stuff covering the flywheel to access the nut holding the clutch in place. Once exposed, you should see a nut in the center of the flywheel, which you need to unbolt.
- After unscrewing the mounting nut holding the clutch in place, you should be able to remove the affected clutch from above the engine crankshaft. If it does not fall off by itself, apply a bit of lubricant to the hole in the center of the flywheel and use a puller tool to safely remove the clutch once the lubricant has soaked it in.
- After the bad clutch has come off, bring in the replacement clutch and position it so that it aligns with the pulley bushing and your engine shaft. This alignment will allow the clutch to slide naturally into place.
- Once everything is aligned, with the slot for the center mounting pin in line with the middle of the flywheel, insert the bolt and secure the nut. Next, use a wrench to tighten the bolt and secure the clutch.
You will notice that removing and reinstalling the clutch may not be a single person’s job. Alternatively, a burned clutch may be stuck in place, refusing to come off.
So, for good measure, it may be best to have a professional help you replace your clutch unless you have some experience with such installations.
What you may need for this task
- Wrenches
- Clutch puller
- Screwdriver
- Socket Set
Why Riding Mower Blades Won’t Disengage in an Idler System
Since the idler mechanism has various components different from those in a clutch system, it will require a different approach to the various problems likely to cause it to malfunction.
1. Loose engagement lever
The engagement lever in an idler system activates and deactivates the mower blades. It forms a crucial part of the complex system of idler components, including the cable, spring, and pulleys.
When working properly, the engagement lever engages and disengages your lawnmower’s idler arm and the idler pulley. It does this by extending and pulling the rod or cable attached to it.
Over time, this lever can break or get loose, making it unable to pull or extend the attached rod or cable responsible for disengaging the mowing blades.
You can tell if the lever is loose or broken by eyeballing it.
What to do when the engagement lever is loose
You should be able to fix the looseness by tightening the bolts and attaching the blade engagement lever to the lawnmower’s frame.
Your unit may have some plastic surround covering the lever. To access the bolts, you will have to use a screwdriver to remove this cover first.
Once the cover is out of the way, you should have uninhibited access to the bolts securing the lever in place.
If the lever is accessible from the rear side of the mower, you can skip this step (removing the plastic cover) and go straight to the mounting bolts.
The tools and supplies for this task
- Socket set
- Screwdriver
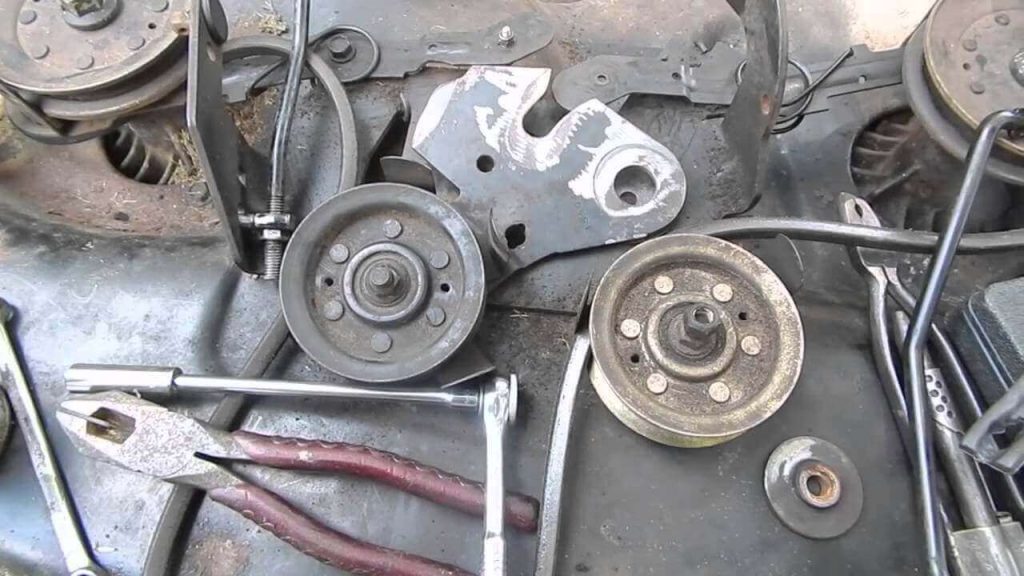
2. Worn idler arm
The idler arm connects the idler pulley to the mower’s deck. It forms part of the idler system that puts tension on your mower’s drive belt alongside the idler arm, spring, and pulley.
A bolt attaches the idler pulley to the idler arm, with the idler arm spring clipping onto the arm.
This spring is responsible for pulling back and disengaging the blade engagement bracket on the mower deck frame.
The deck drive belt rotates around the idler pulley, and this pulley is what completes the deck belt circuit to run the mowing blades.
If the idler arm is worn out, it can develop dents that prevent it from moving freely.
How to diagnose the problem
Now that you know the location and role of the idler arm, you can inspect it to see if it has grooves or bends that might impede its operation.
Start by using the lever to engage the idler system and observe what happens. You should know there is a fault if the arm does not return when you disengage the mower blade.
Check the arm for any noticeable groove, breakage, or bends that might keep it from working properly.
Examine the entire length of the idler arm to see if it is worn out or damaged and requires replacement or fixing.
What to do about a worn idler arm
The solution to a worn idler arm can be one of two options:
- Replace the damaged idler arm or;
- Fix the imperfection if it is superficial
First, lower the mower deck all the way to the ground and disconnect it from the mower, then slide it from under the mowing vehicle.
Removing the deck will allow you to access the idler arm better and work unimpeded.
This will involve undoing all four pins (typically cotter pins), attaching the deck to the mower, and removing the deck belt.
Once you have un-looped the deck belt, unclipped the pins, and removed the washers from each mounting point and mounting bracket, only the idler assembly, should remain to attach the deck to your mower.
What you need to do next depends on whether your unit has an idler cable or rod.
- For an idler rod, untighten and remove the nuts bolting it into place.
- For an idler cable, simply unclip it to free the deck from the mower.
With the deck free from the lawnmower, gently slide it from under the unit to one side of the mower.
This should allow you to remove the worn idler arm and replace it with another one on the deck.
A screwdriver should get the job done, removing the idler spring to set the arm free. After that, you can untighten and remove the bolts with a wrench.
Observe the idler arm to assess the damage. If it has a groove causing it to get stuck while operating, you can file out that groove and reuse the arm.
However, if you are convinced the arm is too worn out to continue working, replace it with another one and reinstall the deck to the mower once the new idler arm is in place.
What you may use
- Screwdriver
- Wrenches
- Pliers
Related: How to make lawn mower easier to pull start
3. Stretched idler cable
Your lawnmower can have an idler cable or idler rod, depending on its design. This component is responsible for transferring motion from the lever to the idler arm when you engage the mower blades.
While an idler rod will be fine, an idler cable does not have the same rigidity and can get stretched over time.
This stretching will affect its ability to transfer motion from the lever to the mounting structures that engage the blades.
How you fix the problem will depend on whether the cable has an idler spring attached or not.
How to fix a stretched idler cable
- Use pliers to un-mount the cable by removing the mounting clips at each end. You will also need to remove the clips holding the cable to the mower along its length.
- Once the idler cable is free from the lawnmower, inspect the idler arm to confirm that it is movable.
- Next, install the replacement cable following the previous steps in reverse.
- After installing the cable, test it by engaging the blades to see if everything works well.
- Use the cable’s adjustment to set it to engage the blades properly.
Note: 1
If the idler cable has a spring attachment, note the end where the spring attaches to the cable and ensure you clip it there when installing the replacement idler spring.
Ideally, the entire procedure you follow will remain the same except for the addition of the spring attachment.
Finally, ensure you install the cable’s lever side before the spring side to make your work easier. Otherwise, the tension from the spring will make it challenging to clip the cable on the lever end.
Note: 2
If your mower has an idler rod instead of an idler cable, the rod can become bent over time.
If this affects your lawnmower, keeping the blades from disengaging, follow the same procedure above to remove the deck and fix or replace the bent rod to correct the problem.
A bent idler rod will likely get caught up during its operation, restricting the required back-and-forth movement while engaging and disengaging the blade.
Just like the idler cable, the rod has an adjustment that you can use to set its sweet spot where it engages and disengages the mower blades seamlessly.
Tools and supplies for this task
- Prying tool (such as a screwdriver)
- Pliers
- Replacement idler cable or rod
- Socket Set
4. Bent or broken mounting points
Your lawnmower blades can fail to disengage due to damaged mounting points.
So we recommend inspecting all the mounting points around your deck where the idler pulley assembly is attached to see if anything looks off.
This should be a quick visual diagnosis that can give you an idea of what prevents your mower blades from disengaging.
If anything looks bent or broken around these attachment points, you can proceed to fix or replace the affected component.
Solution for bent or broken mounting points
You can fix any crooked mounting points on your idler pulley system by straightening them out. This should stop them from obstructing the required movements.
You could use a hammer or grip set to complete this task, depending on the extent of damage or how crooked the metal is.
In any case, consider supporting the mounting point with a block of wood if the amount of repair needed is substantial.
In any case, ensure you are careful not to cause further damage to what you are trying to repair.
What you may need
- Grip set
- Hammer
- A block of wood
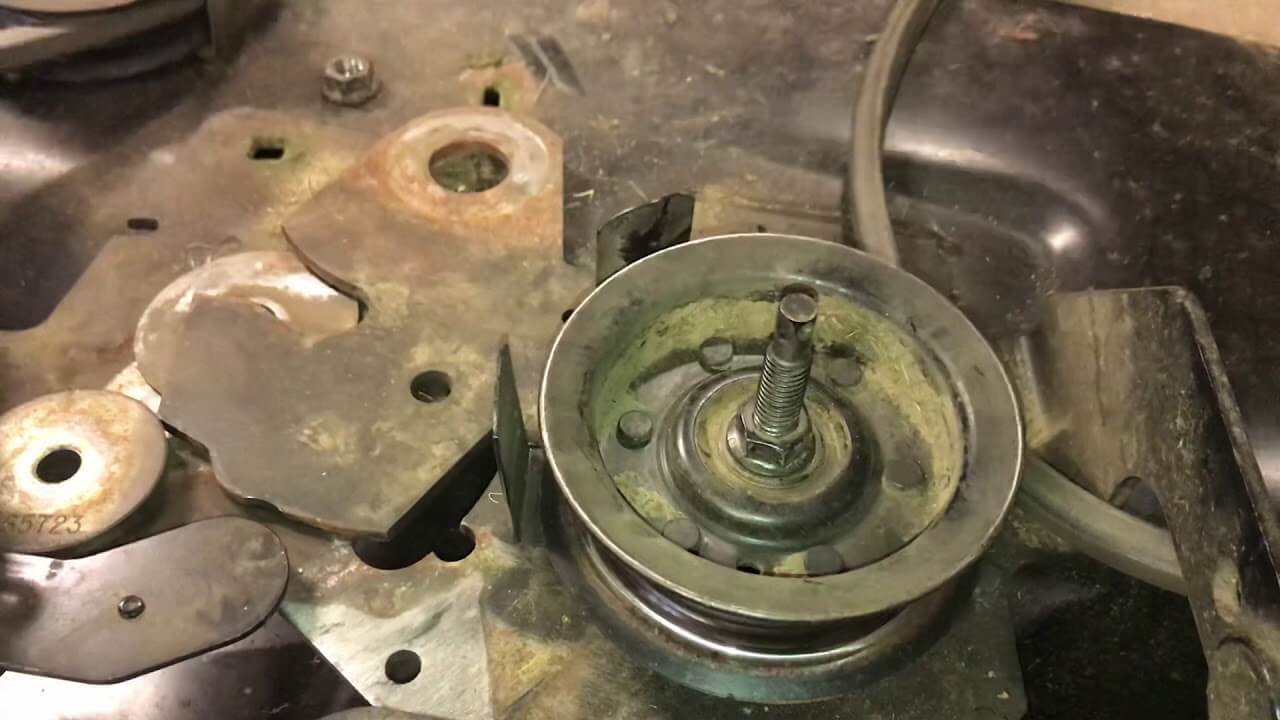
5. Damaged idler pulley or blade engagement bracket
The idler pulley directly applies tension to the deck belt when moved back and forth to engage and disengage the blades, respectively.
This movement is typically made possible by the action of the blade engagement bracket and the return spring.
Over time, the blade engagement bracket can develop divots, causing it to get stuck in after engaging the mower blades. The bearings on the pulleys can also wear out, causing restricted movement.
How to diagnose the problem
Spin the pulley with your hands and observe if it is out of alignment or bent. Such can obstruct the movement of the idler arms when attempting to disengage the blades.
Also, try to manually pull the pulley back and forth on the mounting plate if it is the movable type to see if the bracket sticks.
Solution for a damaged idler pulley and blade engagement bracket
If either or both the components are damaged and causing the blades not to disengage, the solution is to replace them with new ones.
After the installation, move the assembly back and forth again before returning the deck to the mower to check if it moves freely.
What you want is to ensure that nothing is getting caught up while engaging and disengaging the blades.
What you may need
- Socket set
- Wrenches
- Replacement pulley and bracket
- Vice
6. Missing idler return spring
The idler return spring attaches to the idler arm or the blade engagement bracket and helps disengage the blades by pulling back the idler pulley.
Without this spring, the idler pulley and the bracket or idler arm will lack the required tension to pull away when attempting to disengage the blades.
As a result, the blades will stay on. The same problem will likely occur when the spring is damaged or stretched.
What to do
If the idler return spring is overstretched, damaged, or missing altogether, you will need to replace it to enable the blades to disengage normally.
You should find the spring at your local parts shop or on Amazon. Simply hook the new spring onto the bracket or idler arm on one end, depending on your mower deck’s design, and the other end to the deck frame.
To complete this process, you must switch off the unit and manually disengage the blades first.
Once done, you can use pliers to pull and lift the existing spring off of the mower deck (if any) and then install the new one in its place.
After hooking the new spring into place, try out the idler mechanism and see if it retracts the idler assembly with its tension.
What you may need
- New idler return spring
- A pair of pliers
What to do When Riding Mower Blades Won’t Disengage
If the blades on your riding lawnmower won’t disengage, start by placing the machine on a flat level ground, such as the garage, carport, or driveway.
Next, secure the mower tires by placing something sturdy such as a block, against them to keep them from rolling.
Then disconnect the power source by unplugging the spark plug to avoid the engine starting abruptly, causing undesirable accidents especially when solving the Kohler engine problems.
Once you have taken these safety and convenience precautions, you can proceed to diagnose the problem by following the steps outlined in this guide.
We also recommend studying your owner’s manual and following every piece of instruction to the letter whenever making any repairs or replacements.
The instructions provide the best practices applicable to your specific lawnmower model.
Next, read on: Common Problems With Husqvarna Riding Mowers
FAQs
Why does my mower deck not disengage?
Your mower deck may not disengage due to a bad stuck clutch, broken blade engagement switch, or worn cabling. The problem can also result from a damaged or broken idler pulley, cable, rod, spring, arm, or blade engagement bracket.
Why is my PTO switch not working?
The PTO switch on your mower may not work due to improper use or installation issues. If any of these happens, you may have to replace the clutch pack to fix the problem and restore normal operation.
Why won’t John Deere mower blades disengage?
John Deere mower blades won’t disengage, likely due to clutch problems. The tractor might have a bad clutch, a broken blade engagement switch, or worn cabling connecting the blade engagement switch. Fixing or replacing these should restore proper functioning.
Why Craftsman riding mower blades won’t engage?
Craftsman riding mower blades typically won’t engage if the mower’s PTO clutch is not getting power. The problem can also occur due to a defective clutch solenoid or a damaged, worn-out clutch. You must replace a defective clutch to fix this problem.
Why Troy Bilt riding mower blades won’t engage?
Troy Bilt riding mower blades won’t engage if the lawnmower’s PTO clutch is not getting power. The blades will also fail to engage if the mower has a defective clutch solenoid or worn-out clutch. You must replace a defective clutch since it is not reparable.
Why Husqvarna riding mower blades won’t disengage?
Husqvarna riding mower blades won’t disengage due to a clutch problem. This can be a bad clutch, broken clutch engagement switch, faulty blade engagement switch, a short in the wiring connecting the blade engagement switch, or damaged clutch brakes.
Related: Husqvarna mower review
How to engage blades on riding mower
To engage the blades on a manually operated riding lawnmower, start by powering it on by turning the key on the ignition clockwise.
Next, increase the mower’s throttle to half speed and leave it there for about two minutes to warm up the engine. After that, lower the mowing deck to the desired cutting height and engage the blades by pushing the lever to the right of the steering.
How to get blades to stop turning when disengaged?
You can get the blades to stop turning when disengaged by disconnecting the battery and the spark plug. You may also want to get the key out of the ignition once you have switched off your lawnmower’s engine.
Next, read: Do Riding Mowers Have Alternators To Charge The Battery?
Why Riding Mower Blades Won’t Disengage: Final Thoughts
Any lawnmower, old or new, can run into problems causing its blades not to engage or disengage at some point.
Thankfully, each problem can be fixed relatively easily with the requisite knowledge and toolset.
This article has covered the common problems likely to prevent your mower blades from disengaging.
So if your riding mower blades won’t disengage, we hope this material can help you diagnose and fix the glitch.
We also hope you enjoyed this tutorial. Let us know about your experience in the comments.