Can You Overwater New Sod? Sounds like a familiar question right? Especially to the homeowners who are trying to grow first class lawns.
Many homeowners establish their lawns using sod because it’s the easiest way to gain an instant lawn. However, new sod needs a little more maintenance for you to reap the most out of it.
Therefore, knowing how to maintain your new sod can help you avoid some growth problems. If you recently planted new sod on your lawn, there are some crucial care tips you should keep in mind, such as watering.
New sod is likely to become dehydrated, and one way of preventing the new sod from drying is to maintain a consistent watering schedule.
Can You Overwater New Sod?
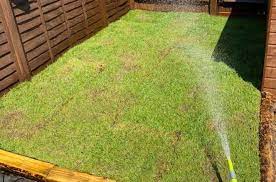
Overwatering new sod is not a great things because it prevents the roots from getting enough oxygen to thrive, leading to diseases, root rot, insect infestation, and more. So to avoid such, it’s better to work with a professional lawn care company to ensure the new sod has the best chance for survival.
Should New Sod be Watered Every Day?
Yes, new sod should be watered daily, especially if installed during the summer season. You do this because consistent watering facilitates the growth of strong roots.
Ideally, you should water your new sod at least twice per day: In the morning and afternoon.
That’s because there are lower wind speeds in the morning, and less water gets lost to evaporation.
Watering Tips
- Avoid watering in the evening as the water remaining on the grass can encourage fungal infestation and the spread of diseases.
- Ensure that water reaches all areas of your lawn, regardless of the irrigation system you use. Many sprinklers miss edges and corners that are susceptible to dehydration.
- Avoid hand watering your sod because It can’t offer uniformity.
How Do You Know If Sod Is Overwatered?
New sod needs more water to take root and establish, but it is an expensive mistake to give it too much water.
That’s because the new sod roots can’t thrive in waterlogged soil; instead, they rot, and the grass blades wilt and die.
So how do you know if sod is overwatered? You can quickly tell that your sod is overwatered by examining the following signs:
Sponginess and puddles
If you walk on the sod and notice water coming up around your shoes while making a squishy sound, you’ll know your sod is overwatered.
Also, look for puddles at lower elevations as excess water gathers in these spots. (Puddles are a clear sign of overwatering).
After your new sod develops for around two weeks, try pulling up the sod in various spots.
If the sod roots come up quickly, you’ll know they are overwatered. But if they resist the pull, they have a sufficient water supply.
Weeds
The presence of weeds is a late sign of overwatering your new sod. Usually, the sod roots wilt and die, creating room for weeds to pop up due to excessive watering.
Why Does New Sod Turn Yellow?
New sod turns yellow due to many reasons, which we will unfold in this guide. Please keep reading for more information.
Overwatering
Yellow patches may imply that your newly installed sod is getting too much water.
Even though new sod requires more water than an established lawn, you should decrease the watering schedule with time.
That means you need to water your new sod for ten minutes, 2 to 3, three times daily for the first week after installation.
In the second week, you will want to reduce watering the new sod to once daily until the roots establish fully.
After four weeks, watering should be cut back to twice per week because the roots are established.
Pet urine
Pet urine burns new sod because of its high nitrogen content, making your new sod turn yellow.
Luckily, you can handle this yellowing by increasing watering to these spots to dilute the pet’s urine. You will notice your new sod regaining its lush green color with time.
Poor soil quality or location
Your newly installed sod may turn yellow because you have planted it near trees and shrubs.
Tree roots are large enough and often win the battle for essential soil nutrients, making it uneasy for your new sod to take root.
Besides, shrubs and trees prevent your new sod from getting direct sunlight, so they yellow with time. So instead of installing your new sod in these areas, create a shade-loving flower border.
Overfeeding
After installation, you should not fertilize your new sod for around 30 to 60 days.
Fertilizing your new sod before this duration results in yellow patches because the shallow roots system of the new sod can’t absorb any nutrients.
Tip
Remember to water the yellowed areas to decrease the nitrogen levels in the soil.
How Soon Can You Mow New Sod

Mowing new sod enhances its visual appearance, but cutting at the wrong time and frequency results in a damaged lawn. That said, how soon can you mow new sod?
The right time to trim new sod with your lawn mower is 10 to 15 days after installation. This waiting time gives the roots enough time to thrive and get stronger in the ground.
Mowing before this duration is discouraged as the sod’s root system is still narrow, which can’t facilitate new growth.
Tip
When mowing new sod, set the mowing height higher than usual to leave enough leaf surface area for photosynthesis.
When Can You Walk On New Sod?
After the effort and time it takes to layout your new sod, the worst thing you want to do is to create gaps by introducing traffic on it before the roots establish.
So the right time to walk on new sod is three to four weeks after installation when the roots are firmly held in the soil.
How Do You Save Overwatered Sod?
Too much of something is terrible, and this applies to many things, including overwatering your newly installed sod.
Overwatering your sod paves the way for insect infestation, root rot, and more. So how do you save overwatered sod?
You can save your overwatered sod by using the tips highlighted below:
Fertilize
After overwatering your sod, you will have to fertilize it to resume normal health. However, be sure not to apply excess fertilizer, which could further damage your sod. Here are some of the best lawn fertilizers for grass.
Treat Fungal Problems
If your newly installed sod suffers fungal infection due to overwatering, apply a fungicide right away. Doing this will save your new sod from dying.
Lastly, you can save your overwatered sod by reducing the watering frequency. Try to assess how much water your sod needs and consider the season, climate, and daily/weekly rainfall.
What Are the Advantages and Disadvantages of Sod?
Installing sod on your lawn costs more than grass seed, but the benefits you’ll get outweigh the added cost. You will notice the benefits of sod soon after installation.
Advantages of installing new sod on your lawn
Instant lawn
Sod turns a bare piece of ground into a grass-covered yard soon after installation, giving you the instant satisfaction of having a lush green yard.
Even if you can’t walk on newly installed sod, it still offers the impression of a finished lawn.
Less Irrigation
Sod requires less maintenance than grass seed once installed. For instance, grass seed dries out fast, meaning you will need to water it 3 to 5 times a day.
By contrast, sod needs to be watered only twice a day. This less frequent irrigation decreases your workload in caring for the new sod and saves you water.
Faster use
Sod develops firm roots 3 to 4 weeks after installation. That means you can walk on it and do other activities faster, unlike grass seeds that take longer to establish, and their delicate leaves can get damaged easily.
Soil protection
Sod is the real deal for preventing the erosion of exposed topsoil. Besides offering immediate cover and stabilization, sod also controls the velocity of storm run-off and enhances drainage in places where grass seeds would be washed away.
Flexibility
Another benefit of using sod is you can plant it at any time of the year, provided the ground isn’t frozen.
Disadvantages
- Sod has a limited planting duration of at least 24 to 48 hours from the time it’s uprooted on the ground to planting it.
- Changes in growing conditions. Sometimes, your soil won’t match the growing requirements of your supplier.
- It is expensive to install sod, which is cost-prohibitive for larger areas.
How to Install New Sod
Sod is used in commercial and residential applications to modify the landscaping look while increasing the property’s value.
Installing it can be a tricky task for DIYers, but you can do it like a pro through this guide.
Read along for more.
Step 1: Remove the existing grass
Before installing your new sod, it’s a good idea to take away the old grass and soil beneath. To achieve this, you have to rent a sod cutter to cut below the grassroots loosening the old grass in long strips.
This will leave you with a level stretch of soil that’s almost an inch beneath the surrounding surfaces.
After that, you can deposit the old sod into your compost pit or confer with a local garden center to see if they’ll accept using it.
Step 2: Prepare the soil
Next, prepare the soil using these straightforward tips:
- Remove all rocks and debris from areas exceeding 2 inches in diameter.
- Till your soil to a depth of around 2 to 3 inches to aerate the soil.
- Fill the low-lying areas to avoid water congestion.
- Test your soil’s PH level to ensure it’s ideal for your new sod.
Once you’re through, level your soil and break the large chunks with a garden rake (also referred to as a bow rake).
Step 3: Lay the new sod
After finishing all those preparations, it’s now time to install the sod. Begin by moistening the soil with a hose, then rake out the footprints left behind.
After that, apply a starter fertilizer to enhance quick root establishment. Next, unwrap the first roll of sod against the longest side of the nearby landscaping, ensuring the full-length contacts the soil under it.
Unroll the next roll and lay it out in a brick-wall pattern, startling the cuts while leaving no gaps (don’t overlap the edges).
If you have a sloped lawn, you will achieve better water retention by installing the new sod horizontally across the slope.
Tip
Ensure you don’t walk on your newly installed sod. Instead, you should stand on bare soil, place the sod before you and back up as you proceed.
If you walk on your newly installed sod, your weight will shift the sod, leaving gaps between edges.
When you encounter obstacles such as trees, shrubs, or flower beds, forge the sod into shape with a garden knife to guarantee a tight fit in that area.
Step 4: Neaten the edges
After laying out the entire rolls, chances are the edges around your space won’t be straight. Don’t worry! Just fold back any excess, then use a box cutter or a sharp knife to trim the sod.
Ensure you cut from the soil side towards the grass side, then tickle down the new edge, leaving no gaps.
Tips
After laying out your new sod, practice consistent watering for 2 to 6 weeks until the sod establishes roots, bonding with the soil below it.
Also, avoid introducing high traffic for the first four weeks after installing your new sod.
Will Sod Grow on Hard Dirt?
When your lawn is covered with hard dirt, your new sod isn’t likely to grow. That’s because the hard dirt limits airflow to the sod roots and prevents water from soaking into the soil.
What Kind Of Topsoil Do I Need For Sod?
Topsoil constitutes most of the soil action. It is where beneficial microbes dwell and organic material decays, creating a conducive environment for your sod roots to establish above the less active subsoil.
So what kind of topsoil do I need for sod? The best topsoil for sod is loamy soil, dark brown to black.
This coloration implies high levels of nutrients In the ground, meaning your soil will have essential microbes that stimulate grass growth.
Tip
If your soil is high quality, tilling is enough to get your lawn ready for sod. But if the soil in your yard is low quality, laying sod on it won’t work.
How Long Does It Take for Sod to Take Root?
The cost of sodding your lawn is eased with the fact that you have an instant lawn instead of waiting for struggling seedlings to develop. But how long does it take for new sod to take root?
With a consistent balance of air, sunlight, and water, your sod develops shallow roots after two weeks and deep roots after six weeks of installation.
However, numerous factors come into play in determining how long it takes. They include:
Good Soil Preparation
Sod takes root quickly, primarily if you practice good soil preparation. Ideally, most grass species establish well on well-drained soils with an acidic PH range of 6 to 6.5.
So before laying your sod, till in the soil amendments, including lime or sulfur and compost. This way, your new sod roots will have a conducive environment for spreading.
Tip
If your sod doesn’t take root, it implies that the roots are struggling to pave through the compacted soil.
So after tilling, it’s wise to roughly level the lawn using a rake and lightly dampen the area to trigger root growth.
Encourage Deep and Rapid Rooting
Experts suggest that you can promote deeper rooting by lessening the irrigation frequency after eight days instead of saturating the sod daily.
So as you water your sod deeply and less frequently, roots search for water naturally as they penetrate the ground. As such, the entire root establishment occurs after 5 to 6 weeks.
Besides watering, your sod root can develop rapidly by using a lawn roller soon after installation.
All you need is to fill the drum at least one-third full, then move the roller across your sod carefully for the new roots and topsoil to conform to each other.
Doing this also takes away the air pockets that prevent rooting progress. Even better, you can fertilize after six weeks to encourage rapid rooting.
How Do I Care For My Newly Laid Sod?
Sod offers a great way to achieve an instant lawn. But for your new sod to thrive as expected, proper maintenance is not an option but a must.
This guide will delve into common care tips to practice after installing your new sod. Keep reading to learn more.
First, it’s essential to keep your new sod moistened 30 minutes after installation, then proceed with the daily watering schedule of twice per day for 6 to 10 minutes at a time.
However, be careful not to overwater your new sod because it has short toots and cannot tolerate too much water at a time.
Also, overwatering your new sod will rob the roots of oxygen, bringing about diseases. Try to keep off the sod two weeks after installation.
This waiting time gives the sod roots enough time to take hold and dig in while preparing the lawn for a healthy mowing cycle.
The first mowing should be after two weeks of sod installation. But in the winter, you may have to stay longer for the roots to establish fully before mowing.
Before mowing, ensure that the mower blade is sharpened correctly. Sharpening the blade offers a clean cut without leaving jagged edges and tearing the grass.
It’s also interesting to know that mowing with a dull and blunt blade creates a brownish-white tone, and tears from dull blades render your lawn susceptible to diseases.
Troubleshooting Tips
- If your newly installed sod fails to take root within two weeks after installation, slowly adjust the watering schedule. Practice watering less frequently but for more extended periods. Note that shady areas take longer to root.
- If the sod starts shrinking until you see gaps at the seams, it requires more water. At this point, it will be a good idea to increase the watering cycle frequency while ensuring your sprinklers reach that area. You may also want to hand-water the problem area until the current status improves.
Lastly, fertilize your new sod after one month. This helps keep insects at bay, minimizing diseases’ spread and encouraging rapid root growth.
How to Knit Seams When Laying Sod
Installing sod is a quick way to attain a lush green lawn, but it won’t appear like an actual lawn unless you knit its seams together.
Knitting the sod seams sections requires a joint effort between you and the grass.
So check out below to find out how to do the trick
First, lay out the sections of the new sod so that the seams between the sections are intersecting. This technique forms a checkerboard effect and makes the seams appear concealed.
After that, trim the sod sections as required to fill the small sections within the lawn. You then set the sod section edges to overlap each other slightly to enhance the knitting together of the sod seams.
Level the sod surface with a lawn roller to ensure each patch is placed into the soil, pressing the seams together for the knitting process to begin.
Take wooden stakes and tap them in the corners of your sod sections using a hammer. This technique keeps the sod units from drifting out of place, allowing the grassroots attach in the soil and the seams to knit together.
You will have to water the new sod thoroughly once you’re through. Then let the sod section seams knit together amid the growing season as the grassroots thrive and overlap.
Is It Normal For Sod to Brown?
Yes, it’s normal for new sod to brown, especially when the cooler spring days fade into the extreme summer season.
New sods are plagued with brown spots because of insufficient watering, leading to dormancy.
At this stage, if you don’t feed the sod with water, it will dry out and die. Another reason your sod turns brown is no contact between the roots and soil.
New sod has shallow roots, meaning it doesn’t access water and essential nutrients properly due to the air pockets left between the soil and your new sod.
So a quick fix to this is watering your sod frequently so the topsoil sinks a few inches into the ground to contact your sod roots.
Now that you’re informed about why brown spots occur, you’re wondering how to fix them. A quick fix to this is water.
Just practice watering your new sod for extended periods to give it enough water that won’t evaporate immediately, especially with the hot summer weather.
Can I Put Sod On Top Of Mud?
No, it’s not worth installing sod on top of the mud because sod needs a durable foundation to implement into the ground properly.
So you should remove barriers such as mud, dead grass, clay, twigs, rocks, roots, and other obstacles before installing new sod.
You should also add topsoil to cover the low areas to create a level foundation for your new sod.
Should I Put Starter Fertilizer on New Sod?
Yes, you should apply starter fertilizer on your new sod because it offers a nutrient boost against unfavorable odds, including competing weed seed germination.
Using the starter fertilizer is relatively easy. All you need is a garden hoe to insert the starter fertilizer into the ground.
Be careful as you till the fertilizer into the ground to not exceed 4 inches deep. Placing the fertilizer too deep might burn the struggling roots and prevent them from thriving.
Don’t forget to water the soil after applying your starter fertilizer. This distributes the fertilizer down to the root zone for proper feeding while reducing the risk of nitrogen burns on the sod’s surface.
Tip
Once you’re through with your starter fertilizer, please keep it away from the lawn to avoid damaging the roots mistakenly from improper application.
Here’s How to Water New Sod:
Final Thoughts
Most homeowners use new sod as a visually appealing ground cover for their lawns because it offers an instant satisfaction of a green yard.
Sod also makes for a denser lawn, preventing the erosion of exposed topsoil. However, all these come at a price.
Installing them is more expensive than the grass seeds, requiring proper maintenance practices such as frequent watering for them to thrive. But…
Read more to learn if you can mow right after aerating.