The convenience of having battery-powered lawn mowers is indisputable. Unlike other corded mowers, these machines incorporate exceptional features and work almost silently.
This is great if you plan to mow your yard without disrupting your family and the neighborhood.
Additionally, such mowers use powerful batteries that deliver the necessary power to crank the mower engine at startup.
However, if left in freezing temperatures, these batteries lose charge, making starting your mower difficult. If this happens, can you jump start a lawn mower with your car?
Can You Jump Start a Lawn Mower With Your Car?
Yes, it’s okay to jump-start a lawnmower with a car, but be sure your mower battery is 12-volt. Don’t jump-start the mower if the two batteries are incompatible since this can result in a battery explosion and injury. If your mower uses a 6-volt battery, and you don’t have a 6-volt jump-starter, your options are to trickle-charge the mower battery by buying a new battery as the best choice.
How Do You Start a Lawn Mower With a Dead Battery?
Starting a lawn mower with a dead battery is not easy, especially for DIYers. This task is hazardous as even a tiny mistake can cause explosions.
That’s why many mower manufacturers caution against jump-starting engines with electronic fuel injection because the slightest mistake might damage the electronics permanently.
But If you’re familiar with jump-starting a car, a lawn mower won’t be an issue. Find more details below on how to jump-start your mower safely.
Step One: Self Protection
Before jump-starting your mower, beware that batteries are hazardous as they incorporate acids and elicit explosive gases.
For this reason, you should wear your work gloves and use eye protection when jump-starting your mower.
Once you’re set, move your mower to a level surface and engage the parking brake. Then drive your vehicle close to your lawn mower and shut off the engine.
Make sure you park the car at least half a meter away from your mower to avoid contacting each other. This is critical as any contact between the two can lead to a short circuit, damaging your car or mower.
Step Two: Open the Hoods/ Wire Connection
Next, open your vehicle’s hood and raise the lawn mower’s seat or hood to expose both batteries.
You should now be ready to attach the jumper cables in the right way to avoid injuring your vehicle’s battery which is in good condition.
Start by connecting one side of the red jumper cable to the positive post of your mower battery. Follow with attaching the other end of the red cable to the car’s positive battery terminal.
Be cautious not to touch any metal with the other end of the red cord, as this might produce sparks and damage the good battery.
After that, engage the black jumper cable to the car’s negative battery terminal, then secure the other end of the cable to the metal mower frame away from the battery and fuel tank.
Next, switch on the ignition key and start your mower engine and let it charge for some minutes.
Step Three: Disengage the Jumper Cables
After running the engine for a while, disengage the jumper cables correctly. Start by detaching the black wire from the mower frame, then disconnect the black wire from your car’s battery.
Next, remove the red cable from your car’s battery and do the same for the mower’s battery.
Once you’re through, connect the mower battery to a charger and charge it as soon as possible. If the battery doesn’t charge, replace it with a new one.
Also, find out other ways of charging a lawn mower battery without a charger in case your batteries die.
How Do You Jump a Lawn Mower Without a Battery?
Engaging a car battery to your mower’s power source is not entirely secure, as differences in amperage and other aspects can manipulate the success of your jump-start.
For this reason, battery experts offer better ideas for your power problems which I have discussed below.
First, you will need a trickle charger to solve your unexpected battery problem. Disconnect the mower battery, attach it to the trickle charger and let it charge until complete.
Once you’re through, test the battery to see if your mower ignites.
How to Install a Battery In a Lawn Mower?
Most mowers rely on rechargeable storage batteries to deliver sufficient energy to ignite the engine.
But these batteries lose their ability to hold a charge with time, therefore, needing replacement.
The replacement process is very straightforward, and it involves removing the outmoded battery and installing a new one. Find out how to achieve that using these simple techniques:
Step One
First, position your mower on a flat, clear area, and prepare to service it safely. Confirm that the mower starting key is off before removing it. Detach the spark plug wire.
If you own a riding mower, disconnect the blade, set the parking brake, then put neutral transmission.
Next, locate the battery compartment found below the seat or hood of a riding mower or at the rear of a push mower.
Step Two
Remove any covers, shrouds, or panels that prevent access to the battery. In most mowers, these obstacles are held in place by screws that you should unfasten with a standard screwdriver.
Also, other models have these obstacles held in place with hex-headed bolts that you should undo with a medium-sized wrench.
Step Three
Next, disengage the black cable from the old battery’s negative terminal by unfastening the bolt or screw connecting the cable to the battery terminal.
Then pull the wire away from the terminal and detach the red wire similarly.
Step Four
Extract any hold-down rod or frame that secures the battery to your mower, and be sure to wear your gloves in the process.
You will notice the battery hold-down is secured by two hex bolts which you will need to unfasten with a wrench.
After that, move the unfastened hold-down away, lift the battery, remove it from its compartment, and set it aside.
If your mower has a strap, you will easily pull out the battery from the box. Then clean the battery compartment with a rag damped in a water mixture and 50-50 baking soda.
Step Five
Place the old battery in a secure cardboard box, then take it to a dealer that sells mower batteries. Ask the dealer to give a new battery that resembles the old one.
You will need to double-check the replacement battery to ascertain that it matches the previous battery’s capacity, dimensions, terminal replacement, and voltage.
If its specs are equivalent to the old battery, you rest assured it is compatible with your mower.
So, lower the replacement battery into the battery compartment, and ensure it sits in the same direction as the old one. Reinstall the hold-down and reconnect the battery cables to the replacement battery.
Ensure the red line connects to the battery’s positive terminal, then tighten the nut securing the cable to the terminal. After that, attach the black cord to the battery’s negative terminal and tighten the nut.
Once You’re through, start the mower. If the mower doesn’t start in the typical fashion, you didn’t install the battery correctly. Therefore, you will want to remove it and reinstall it correctly.
Can You Run a Lawn Mower On a Car Battery?
Yes, it’s possible to run a lawn mower on a car battery, provided the mower battery has the same voltage as your car battery.
This way, the car battery will offer you more cranking time, especially if the mower has a difficult start.
If your mower battery is not 12 volts, the higher capacity of a car battery will damage the mower.
How Do I Start My Lawn Mower With a Bad Starter?
You can’t avoid issues with your mower, such as bad starters. This happens due to various problems, including faulty starter motors, flat batteries, or faulty solenoids.
If your mower suffers any of these problems, your starter won’t work. Therefore, you will need to have a little knowledge of how to start a lawn mower with a bad starter to keep your mower running again.
First, clean the battery leads and cover any leakages. ( if the battery is damaged beyond repair, replace it).
Next, bypass the solenoid and place a metallic connection between the cables that connect the battery to the starter motor.
Then try starting your mower. If it elicits a whirring sound, it means you’re almost there. So continue starting the mower until it resumes operation.
If this doesn’t work for you, please diagnose the following problems for your mower to Start as usual.
~Faulty Battery
A defective battery can be very frustrating if you plan to mow your lawn. This can be the main culprit why your mower starter isn’t functioning.
So ensure that you examine your mower battery for any damages by charging it. If it becomes wet, your battery might be leaking, meaning you will have to either seal it or replace it based on the severity of leakage.
~Faulty Ignition Switch
A faulty ignition switch can also result in a bad starter. So examine all wires attached to the ignition switch and ascertain no loose connection.
Also, check if there is corrosion behind the ignition switch. If you notice any defect on the ignition switch that can be the reason for a bad starter, replace it immediately, especially when dealing with Kohler ignition coil problems.
How Do You Start a Lawn Mower With a Screwdriver?
Big lawnmowers are commonly used to mow extensive gardens with plenty of grass because of their speed and mowing capabilities.
These machines enhance your mowing experience by integrating comfortable seats to minimize back fatigue. But what if you break or lose your mower key?
You will need to know how to start your lawnmower with a screwdriver. But don’t worry if you are not well-versed with this technique, as I have highlighted for you the whole process below: read on!
Step 1: Engage Your Mower’s Brakes
First, set your mower brake to the parking position. This depends on the mower type you use.
Some models have a lever that you will need to pull to engage the parking brakes. But in most mowers, you only need to press the brake pedals.
Step 2: Disconnect the Cutting Blades
This step requires many precautions to avoid damages caused by the back start. You will also need to wear your work gloves before disconnecting the mower blades.
Step 3: Locate the Ignition Coil and the Battery
After setting the mower to parking mode and disengaging the blades, it’s now time to locate the battery.
The battery sits on the left or right side below the mower hood. But this depends on your mower model.
After locating the battery, you can also find the ignition coil quickly by following the direction of the cables moving from the battery to it.
It’s best to confer with the user manual to see any part you are looking for in the exact position.
Step 4: Use Your Screwdriver to Link the Mechanism
Next, locate a small box hooked on either side of the engine compartment. Then, use a screwdriver to bridge the starter and the solenoid (ignition coil).
Touch Both connectors with your two-head screwdriver and let the mower start. This may take several attempts if the first attempt fails.

Method 2
If you find it challenging to implement the method above, use this simple technique below:
First, set your mower to the parking brake and disconnect the blades as a precaution against damage.
Secondly, take a flat head screwdriver that’s smaller than the ignition hole and place it in the keyhole.
You should do this carefully, so the screwdriver aligns perfectly inside without harming the ignition chamber.
After that, try rotating the screwdriver in the hole until the engine starts to roar. Continue doing this slowly until the engine starts.
Reminder:
Remember that this technique might not work on all mowers because some models have a security procedure, preventing the keyhole from starting with other things apart from their key.
Are Lawn Mower Batteries the Same as Car Batteries?
Most mower and car batteries are designed to work with a 12-volt electrical system. However, car batteries are more robust and bigger as they need a surge of energy to ignite the engine quickly.
So both mower and car batteries fulfill the same functions, but they are not the same. The main difference between a car and a mower battery lies in their lifespan.
Mower batteries can tolerate four years of rough handling, unlike car batteries that need replacement after a while due to frequent use.
What Are The Advantages of a Battery Charger?
The essence of a battery charger is to communicate with the target battery. This device minimizes the input current when the charge level reaches the recommended point.
Besides, it tops off your battery by trickle charging. This mechanism prevents your battery from overheating and generating chemicals that harm the battery cells, reducing the battery’s lifespan.
Additionally, a battery charger controls the input current of the previous bulk charge, which prevents the target battery from charging too fast and overheating.
Therefore you should own a battery charger to help you during emergencies; here are some of the best mower battery chargers to pick from.
How Do You Test a Lawn Mower Starter With Jumper Cables?
The starter on your lawnmower gets its electricity from the onboard battery. The circuit starts at the Ignition key, similar to a car.
Once you turn the key, it completes the circuit through an electrical connector, sending the starter enough power to spin the flywheel that ignites the engine.
If your lawn mower starter is defective, you will want to know how to test it with jumper cables. Find out more of this below:
Step One
Locate the battery and starter in your lawnmower with the help of the user’s guide. Then locate the electrical terminals where the wires are connected to the starter and battery.
Step Two
Use a stiff-bristled brush to cautiously brush off the battery terminals to guarantee a solid electrical connection.
Step Three
Wear protective rubber gloves and safety glasses. Then connect one side of the black cable from the jumper cable to the negative terminal on the battery and secure the other end to any metal frame of the mower.
Step Four
Lastly, connect one end of the red cable to the positive terminal on your battery. Then attach the remaining part of the red jumper cable to the positive side of your starter and examine the outcome.
If the starter is in peak condition, it will turn over. If it’s defective, replace it.
How Do I Know If My Lawn Mower Starter Solenoid is Bad?
Most of today’s lawnmowers come with electric starting systems. These electric starting systems provide great convenience over traditional methods that involve blowing your muscles out pulling a cord to start the mower.
One essential part of a mower’s electrical system is the starter solenoid. When you ignite the motor, this small relay device binds the high-amperage electrical connection between the mower battery and the starter motor.
So if your starter solenoid is damaged, your mower won’t start at all because a faulty solenoid limits the electric charge to the starter motor.
So how can you tell if your mower starter solenoid is bad? You can tell that your mower starter solenoid is bad by checking out for the following symptoms:
A Clicking Sound Coming Out From The Starter Motor
When you press the ignition switch, a bad lawnmower starter manifests itself in a clicking sound because the mower doesn’t get the required current to start the engine.
Starter Motor Keeps Running After the Engine Ignites
Once the engine ignites, your starter solenoid should turn off for the clutch to retract. So, your starter solenoid might be faulty and needs replacement if it continues running after startup.
Poor Engine Starts
Intermittent starting problems also characterize a faulty starter solenoid. Or, you will realize that the mower doesn’t produce sound when you start the engine.
Once you notice the signs mentioned above, you’ll know that your mower starter solenoid is defective. Ideally, the next course of action is replacing it.
Please use the steps below to replace your mower starter solenoid and get your mower running again.
Step 1: Remove the Battery
Before starting this step, wear your work gloves to protect the hands, switch off the ignition key and remove the key. Next, access the battery and unfasten the bolt attaching the negative cable to your battery.
After that, raise the insulating cover, undo the bolt connecting the red cable to the battery, and remove the battery from its compartment.
Step 2: Uninstall the Battery Box
Remove the battery box and find the wires attached to the starter solenoid. Follow with unfastening all the mounting nuts from the terminal posts and pulling the wires from the coil spades.
You will need to locate the mounting bolt that secures the starter solenoid to unfasten it. Then, pull out the starter solenoid from the mower by rotating it forward.
Step 3: Insert the New Starter Solenoid
After successfully uninstalling the old starter solenoid, it’s now time to install a new one. Begin by transferring the mounting clip from the previous solenoid to the new one.
Then place the new starter solenoid on the frame and secure it with a mounting bolt. Next, reinstall wires on the terminal posts, engaging them with the mounting nuts.
Step 4: Reinstall the Battery Box
This step involves lowering the battery box into the lower body and engaging the retaining tabs.
Then insert the battery into the battery box. Lastly, align the cables to the terminals as expected with the insulating cover sitting on the cable.
How Do I Know If I Have a Bad Ignition Switch?
A bad ignition switch can make your mower start misbehaving, causing inconsistency in mowing.
Luckily, I can help you determine if you have a faulty ignition switch through the information highlighted below:
Here are some common ignition issues
The Mower Doesn’t Shut Off Until You Disengage the Spark Plug
Usually, when you turn off your mower, the engine should shut off. However, sometimes you will find yourself disconnecting the spark plug wire to stop your engine.
Various things can cause this, but a faulty ignition switch is the main culprit. A quick fix to this is checking the ignition switch using an ohmmeter to confirm a connection between the “S” and “B” terminals.
If you don’t see any, your ignition switch is defective, and you will need to replace it for your mower to resume operation.
Mower Doesn’t Start
A mower that doesn’t start is an early sign of a faulty switch because of insufficient current to get the mower running.
Ideally, there is no proper way to deal with this power supply issue apart from replacing it.
Why Does My Mower Battery Loose Charge After 1 or 2 Uses?
Many things can make your mower batteries drain quickly, including storing the battery in freezing temperatures and the following aspects:
Corrosion Around the Posts
Corrosion around the battery terminals shows that gases are leaking out and reacting with the metal terminals.
It also means your battery has loose connections, making it work harder than usual, therefore draining it of power quickly.
Luckily, a quick fix to this issue is to clean out the corrosion and tighten any loose connections on the batteries.
Low Charge
Mower batteries lose their charge after three to four weeks. So waiting for a longer duration between uses can drain the battery so much that it won’t restart your mower.
How to Tell the Size of a Lawn Mower Battery
It’s good to know the size of your lawn mower battery to avoid charging it with the wrong charger that doesn’t correspond to its voltage level. Please follow these steps to identify your mower’s battery size:
Step One: Access the battery on your lawn mower. On push lawnmowers, the battery is secured at the base of the handlebars below a case. You will find the battery under the driver’s seat on riding mowers.
Step Two: After locating your battery, determine its dimensions. Small 6-volt batteries have a small rectangular shape measuring 4 by 6 inches. The 12-volt batteries have a large rectangular shape measuring 8 by 10 inches.
Step Three: Check the top of your battery. You should see a label indicating whether your battery uses a 12 volt or 6 volts.
Step Four: Next, locate the cell cap found at the top of the battery. The 6-volt battery has one cap, whereas the 12-volt battery has two caps. Pry them off with your screwdriver to expose the cells. You will notice that 6-volt batteries have three cell holes below the cap, whereas 12-volt batteries have six-cell holes.
This makes it easy to distinguish your batteries to avoid ruining them with an incompatible charger.
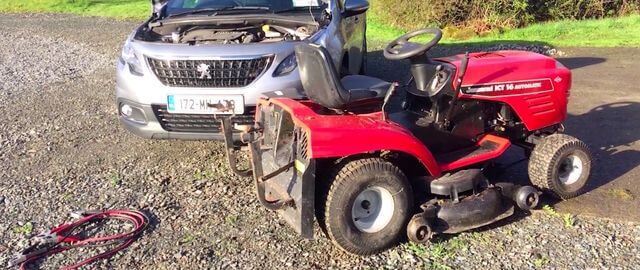
Here’s How to Jump Start a Lawn Mower Using Your Car:
Conclusion
Battery-powered lawnmowers are currently trendy for their sense of style, reliability, and reduced maintenance.
These farm equipment are designed with onboard batteries that deliver sufficient energy for your mower to work for a minimum of 1 hour without power drop off.
However, one inevitable problem with battery-powered mowers is the batteries losing charge, causing the engine not to start.
You shouldn’t worry if this happens, as you can jump-start your mower battery for your machine to resume functioning. But…
Can You Jump Start a Lawn Mower With Your Car?
Yes, jump-starting a lawnmower with your car is not a big deal as long as you take precautions in the process. Ensure that your mower battery uses a 12-volt system, and always remember to wear heavy rubber gloves to avoid injuries.
I hope the information in this guide will help you jump-start your lawn mower successfully. If you have any issues concerning this topic, please share them in the comment section below.